OES 11g R2 -OAM 11g R2 Integration with MOSS 2010
1. Go to C:\Program Files\Common Files\Microsoft Shared\Web Server Extensions\14\TEMPLATE\GLOBAL and Edit default.master file as follows.
Add the line (in yellow) in the following block of lines-
<head runat=”server”>
<meta name=”GENERATOR” content=”Microsoft SharePoint”>
<meta name=”progid” content=”SharePoint.WebPartPage.Document”>
<meta http-equiv=”Content-Type” content=”text/html; charset=utf-8″>
<meta http-equiv=”Expires” content=”0″>
<SharePoint:RobotsMetaTag runat=”server”/>
<title id=”onetidTitle”><asp:ContentPlaceHolder id=”PlaceHolderPageTitle” runat=”server”/></title>
<SharePoint:CssLink runat=”server”/>
<SharePoint:Theme runat=”server”/>
<SharePoint:ULSClientConfig runat=”server”/>
<SharePoint:ScriptLink language=”javascript” name=”core.js” defer=”true” runat=”server” />
<SharePoint:CustomJSUrl runat=”server” />
<SharePoint:SoapDiscoveryLink runat=”server” />
<asp:ContentPlaceHolder id=”PlaceHolderAdditionalPageHead” runat=”server”/>
<SharePoint:DelegateControl runat=”server” ControlId=”AdditionalPageHead” AllowMultipleControls=”true”/>
<asp:ContentPlaceHolder id=”PlaceHolderBodyAreaClass” runat=”server”/>
<SharePoint:DelegateControl runat=”server” ControlId=”PageHeader”/>
</head>

Create Site in MOSS2010
1. Go to Startup > click on SharePoint Central Administration
2. If It will ask for Username and password (provide username/password used for windows login)
3. In the home page click on Application Management

4. Click on Create New Web Application.

5. Provide the following Information


6. Click on OK.


7. Click on Create Site Collection link and provide the following information

8. Provide the Administrator Name.
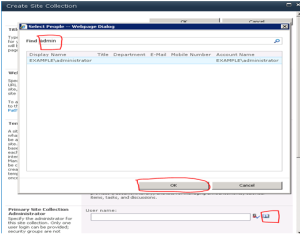

9. Click on OK.


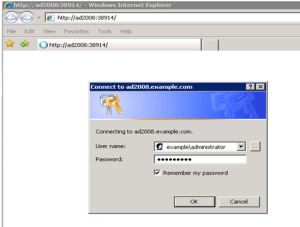
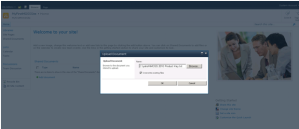
10. Click on the link a prompt will be displayed, provide site admin credentials.
11. Home page will be displayed.

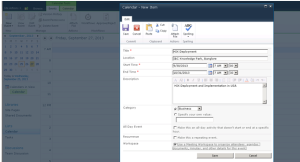
12. Click on All Site Content.

13. Create Announcement/ event and add new link as required.


http://ad2008:38914/HIX/SitePages/Home.aspx
14. To create WS SM Edit the following file: $OES_CLIENT_HOME/oessm/SMConfigTool/smconfig.ws.controlled.prp
# Policy dustribution mode. Possible values:
# controlled-push – if this mode is set you need to configire Policy Distribution configiration parameters
oracle.security.jps.runtime.pd.client.policyDistributionMode=controlled-push
# ——– Policy Distributor connectivity information – required for controlled-push distribution mode
oracle.security.jps.runtime.pd.client.RegistrationServerHost=oeseval.oeseval
oracle.security.jps.runtime.pd.client.RegistrationServerPort=7002
#———- ONLY for WS SM —————————–
# port number to accept authorization requests
oracle.security.jps.pdp.wssm.WSServiceRegistryPortNumber=9000
# SM name
oracle.security.jps.runtime.pd.client.sm_name=MOSS_WS_SM
# >>>>>>>>>>>>OPTIONAL PARAMETERS<<<<<<<<<<<<<<<<<
# ———— Only for Java SM, WS SM, and RMI SM in controlled-push mode ——————–
# port to listen for policy distribution. Picked automatically by SM config tool if not specified
oracle.security.jps.runtime.pd.client.DistributionServicePort=
oracle.security.jps.runtime.pd.client.sm_type=ws
15. Run the config.cmd ($OES_CLIENT_HOME/oessm/bin)
config.cmd –smConfigId <SM_NAME_AS _IN_PRP_FILE> -WSListeningPort 9000 -prpFileName $OES_CLIENT_HOME/oessm/SMConfigTool/smconfig.ws.controlled.prp

16. To create MOSS SM Edit the following file: $OES_CLIENT_HOME/oessm/mosssm/adm/configtool/moss_config.properties
### This files lists properties for SMConfigTool to configure MOSS Server
################################################################################################
#### Follwoing section are mandatory properties, make sure the properties are set ## ###### correctly ####
################################################################################################
### Microsoft .NET Framework Global Assembly Cache Utility Location
gac.utility=C:/Program Files/Microsoft SDKs/Windows/v7.1/Bin/gacutil.exe
### WINDOWS 2003 and .NET 3.0 Global Assembly Cache Utility Location
## gac.utility=C:\\WINDOWS\\Microsoft.NET\\Framework\\v1.1.4322\\gacutil.exe
### Location of Microsoft Sharepoint web server extensions, which is the “location” value of
### registry key “HKEY_LOCAL_MACHINE\\SOFTWARE\\Microsoft\\Shared Tools\\Web Server Extensions\\12.0\”(MOSS 2007) or
### “HKEY_LOCAL_MACHINE\\SOFTWARE\\Microsoft\\Shared Tools\\Web Server Extensions\\14.0\”(MOSS 2010).
## FOR MOSS 2010 ##########
moss.webextension.location=C:/Program Files/Common Files/Microsoft Shared/Web Server Extensions/14/
## FOR MOSS 2007 ##########
## moss.webextension.location=C:\\Program Files\\Common Files\\Microsoft Shared\\web server extensions\\12\\
### moss web config file
moss.web.config=C:\\Inetpub\\wwwroot\\wss\\VirtualDirectories\\32992\\web.config
NOTE- 32992 is the port number of site created (refer your site’s web config)
### OES webservice uri
moss.SmUrl = http://ad2008.example.com:9000
### log4net configuration file
moss.log4NetXmlfile= C:/oracle/product/11.1.1/as_1/oessm/mosssm/adm/runtime/log4net.xml
### moss site uri that OES is to protect
moss.sharepointSite= http://ad2008.example.com:38914
### the application ID to represent the protected MOSS web application
application.id = MossApp
### OES resourcetype name of all the MOSS resources
moss.resourcetype = MossResourceType
### resource extensions that is ignored when doing authorization, for example, the js and css scripts are usually ignored.
moss.IgnoredExtensions=png,js,css,axd
### URL expression that is ignored of OES authorization, for example, the login pages should usually be ignored.
### Following value gives a sample of which URL should be ignored for MOSS2010 FBA site if default login page is used.
### For MOSS 2007 FBA site, _layouts/login.aspx should be ignored if the default login page is used.
moss.IgnoredURLExpression=/_layouts/Authenticate.aspx,/_login/default.aspx,/_forms/default.aspx
######################################################################################
#### Following are the optional properties, default value will be used if not set ####
######################################################################################
### operation for MOSS configuration, config or remove, default to config
moss.operation = config
### MOSS version,supported versions are 2007 and 2010, default to 2010
moss.version=2010
### enable OES: default is true
moss.enableOES=true
17. Run the config.cmd ($OES_CLIENT_HOME/oessm/bin)
config.cmd –smType moss -prpFileName $OES_CLIENT_HOME\oessm\SMConfigTool\smconfig.ws.controlled.prp
-mossprpFileName $OES_CLIENT_HOME\oessm\mosssm\adm\configtool\moss_config.properties
NOTE- If copy/paste does not work properly then enter the details manually.

NOTE- If in the execution of command it shows error stating installation of MOSS DLL then add the (log4net.dll and OES.Sharepoint.dll) using the following command.
gacutil.exe -i “$OES_CLIENT_HOME\oessm\mosssm\lib\log4net.dll”
gacutil.exe -i “$OES_CLIENT_HOME\oessm\mosssm\lib\OES.Sharepoint.dll”

NOTE- If the site is created with Classic Mode Authentication, then existing OES.Sharepoint.dll may not work. Please let me know for the updated dll to support Classic mode authentication. It will be scheduled to be released on PS2.
18. Run the following command from $OES_CLIENT_HOME\oessm\mosssm\lib
MOSSResourceDiscovery.exe
Enter the folder path where you want to create OES policy file
C:\MOSSResource (This should be created beforehand)
Enter Path where Admin Url file is located
$OES_CLIENT_HOME \oessm\mosssm\adm\discovery\AdmUrls.txt
Enter SharePoint site URL and DONOT append url with /. e.g. http://sharepoint01
http://ad2008.example.com:38914
Enter Application Name of the MOSS application to be protected by OES. e.g. MossApp
MossApp (this is same as in moss_config.properties)
Enter Resource Type of all the MOSS resources. e.g. MossResourceType
MossResourceType

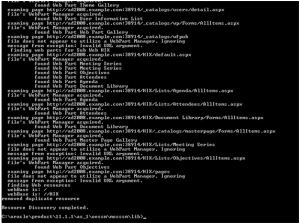
19. The directory will contain the following files-

20. Open the $OES_CLIENT_HOME\oes_sm_instacnes\<INSTANCE_HOME>\config\wsclient\jps-config.xml then made the highlighted changes to it –
<propertySets>
…………………………………………….
<propertySet name=”props.db.1″>
<property value=”cn=<DOMAIN_IN_WEBLOGIC>” name=”oracle.security.jps.farm.name” />
<property value=”DB_ORACLE” name=”server.type” />
<property value=”cn=jpsroot” name=”oracle.security.jps.ldap.root.name” /> <property name=”jdbc.url” value=”jdbc:oracle:thin:@<OPSS_SCHEMA_HOST>:<PORT>/<SID>” />
<property name=”jdbc.driver” value=”oracle.jdbc.driver.OracleDriver” />
<property name=”security.principal” value=”<OPSS_SCHEMA_NAME>” />
<property name=”security.credential” value=”<OPSS_SCHEMA_PASSWORD>” />
</propertySet>
…………………………………….
</propertySets>
<serviceProviders>
……………………………………………………………….
<serviceProvider type=”POLICY_STORE” name=”policy.rdbms”>
<property name=”policystore.type” value=”DB_ORACLE”/>
</serviceProvider>
…………………………………………………….
</serviceProviders>
<serviceInstances>
………………………………………………………………………………….
<serviceInstance name=”credstore.enroll” provider=”credstoressp” location=”D:\oracle\product\11.1.1\as_1\oes_sm_instances\MOSS_WS_SM\config\enroll”/>
<serviceInstance name=”pdp.service” provider=”pdp.service.provider”>
<property name=”oracle.security.jps.pdp.PDPTransport” value=”WS”/>
<property name=”oracle.security.jps.pdp.proxy.PDPAddress” value=”http://ad2008:9000″/>
<property name=”oracle.security.jps.pdp.proxy.RequestTimeoutMilliSecs” value=”10000″/>
<property name=”oracle.security.jps.pdp.proxy.FailureRetryCount” value=”3″/>
<property name=”oracle.security.jps.pdp.proxy.FailbackTimeoutMilliSecs” value=”180000″/>
<property name=”oracle.security.jps.pdp.proxy.SynchronizationIntervalMilliSecs” value=”60000″/>
</serviceInstance>
<serviceInstance name=”policystore.db” provider=”policy.rdbms”>
<property name=”policystore.type” value=”DB_ORACLE” />
<propertySetRef ref=”props.db.1″ />
</serviceInstance>
</serviceInstances>
<jpsContexts default=”default”>
<jpsContext name=”default”>
<serviceInstanceRef ref=”pdp.service”/>
<serviceInstanceRef ref=”policystore.db”/>
</jpsContext>
……………………………………………………….
</jpsContexts>
</jpsConfig>
21. Go to $OES_CLIENT_HOME\oessm\bin and open the ‘manage-policy.cmd’ file and set the following variables-
SET OES_CLIENT_HOME=”C:\oracle\product\11.1.1\as_1”
SET OES_INSTANCE_NAME=MOSS_WS_SM
22. Run the following command ‘manage-policy.cmd’ and give parameter values as configured in earlier steps.
NOTE- Run the command for object1.

23. The output will be something like-

24. Now go to APM console and verify that the Application and Resource Type is created.

- 25. Resources are also created.
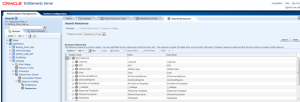
26. Entitlement is also created.

- 27. A default authorization policy is also created.
28. Copy the $JAVA_HOME\jre\lib\logging.properties file to $OES_INSTANCE_HOME\config and change the following highlighted values-
………………………………………………………………………………………………..
# handlers= java.util.logging.ConsoleHandler
Note– Disable the above handler.
# To also add the FileHandler, use the following line instead.
handlers= java.util.logging.FileHandler
.level = FINE
…………………………………………………………………………………………………………………….
# default file output is in user’s home directory.
java.util.logging.FileHandler.pattern = C:/Logs/SMLogs/Java_%u.log (path of log file to be created)
java.util.logging.FileHandler.limit = 50000
java.util.logging.FileHandler.count = 1
java.util.logging.FileHandler.formatter = java.util.logging.SimpleFormatter
# Limit the message that are printed on the console to INFO and above.
# java.util.logging.ConsoleHandler.level = INFO
#java.util.logging.ConsoleHandler.formatter = java.util.logging.SimpleFormatter
………………………………………………………………………………………………………………………………
29. Edit the log4net.xml located in $OES_CLIENT_HOME\oessm\mosssm\adm\runtime
And change the following highlighted values-
<log4net>
<appender name=”RollingFileAppender” type=”log4net.Appender.RollingFileAppender”>
<file value=”C:\\Logs\\OES.Sharepoint.log” />
<rollingStyle value=”Size” />
<appendToFile value=”true” />
<maximumFileSize value=”1024KB” />
<maxSizeRollBackups value=”10″ />
<layout type=”log4net.Layout.PatternLayout”>
<conversionPattern value=”%level %d %logger – %message%newline” />
</layout>
<lockingModel type=”log4net.Appender.FileAppender+MinimalLock” />
</appender>
<root>
<level value=”DEBUG” />
<appender-ref ref=”RollingFileAppender” />
</root>
</log4net>
30. Start the WS SM $OES_CLIENT_HOME\oes_sm_instances\WEB_SERVICE_SM\startWSServer.cmd

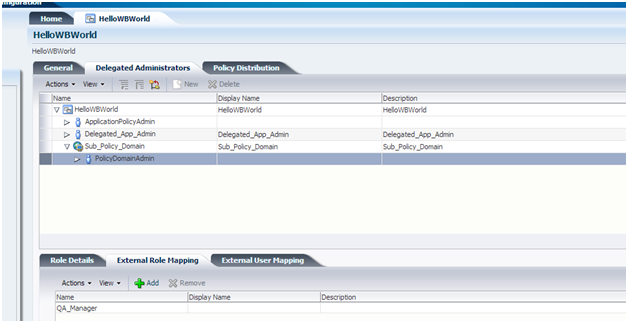
31. Go to the APM Console and Follow the steps to complete the integration.


NOTE- You will now be able to create and push policies to the PDP.
32. Click On Authorization Management. Then Select the application created during this set up and click New under Authorization Polices.

33. Now Create a new authorization policy to grant view to all users on all resources-
| Effect |
Permit |
| Principals |
Authenticated-Role, Anonymous Role |
| Resource Expression |
.* |
| Targets |
View,ANY |

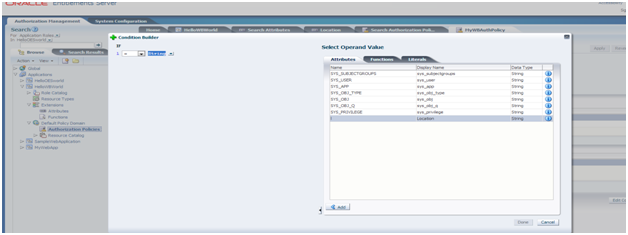
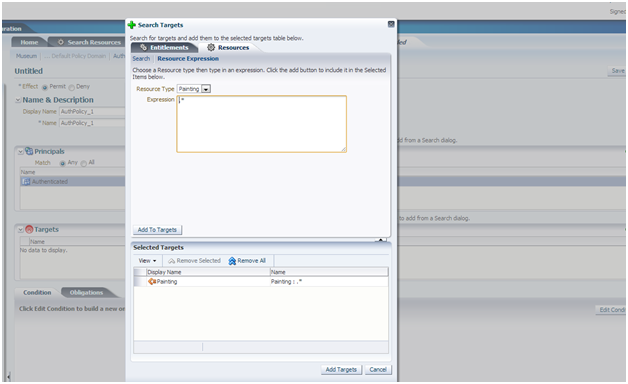
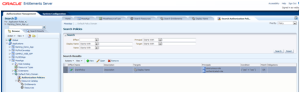
34. Now select the + for Targets and click on Resources > Resource Expression and enter the details as mentioned in the screenshot.

35. Then select both the actions.

36. Now the policy will look like below. Save the Policy.

37. After Authorization policy is created and saved, Click on the Application name at the top and then Click Policy Distribution tab. Then Click Distribute.

NOTE- In the case of integration with OAM, All header variables need to be created as dynamic Attribute Extensions in each domain if Header variables need to be used as condition in Authorization Policy.
38. Copy the old class file (HelloWBWorld) to “$OES_CLIENT_HOME/oes_sm_instances/ MOSS_WS_SM”
39. Start Web Services SM Server:
a. Open a new window
b. cd to “$OES_CLIENT_HOME/oes_sm_instances/MOSS_WS_SM”
c. Start Web services SM process by running “./startWSServer.sh”
d. Wait till you see “WS SM has started”

40. Open new window and check whether classpath is set to oes-client.jar. if not set it-
set JAVA_HOME=c:\Java\jdk1.6.0_35
set PATH=d:\Java\jdk1.6.0_35\bin;%PATH%
set CLASSPATH=.;c:\oracle\product\11.1.1\as_1\modules\oracle.oes.sm_11.1.1\oes-client.jar

41. Change the resource name and action in the file as per the artifacts created.
42. Compile the HelloWBworld.java with following command-
javac -cp %CLASSPATH% HelloWBWorld.java
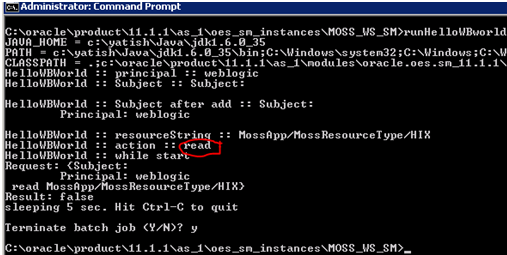
43. Run the class file with following command-
java -cp %CLASSPATH% -Doracle.security.jps.config=./config/wsclient/jps-config.xml HelloWBWorld
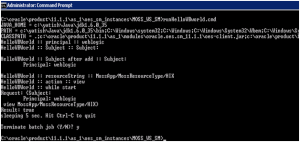
44. Now change the action name in the file and run the program again.

45. Create a user In AD and give them permissions to act like OS.
46. Open AD and Click add user.

47. Create MOSSAdminUser and set the password to never expire


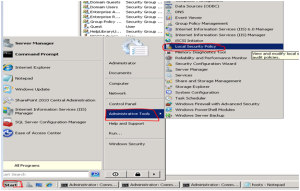
48. Now open up Local Security Policy expand Local Policies and Click on User Rights Assignment. Then Right Click on Act as part of the operating system and select properties.


Set up OAM to protect SharePoint
1. Go to the OAM admin Console to create a webgate. Click New OAM 10g Webgate

- 2. Give it the name IIS host identifier will automatically be filled in. click apply
3. In the next screen give it the user we created with OS level permissions and click apply.

4. Install the webgate on the sharepoint box. Unzip oam_int_win_v12_cd1.
5. Unzip oam_int_win_v12_cd1
6. Run Oracle_Access_Manager10_1_4_3_0_CR2_Win64_ISAPI_WebGate.exe
7. Click next twice

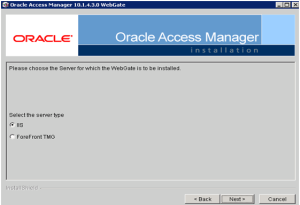
8. Select IIS
9. Select Install Directory. Select Next

10. Select Next

11. Click Yes to All

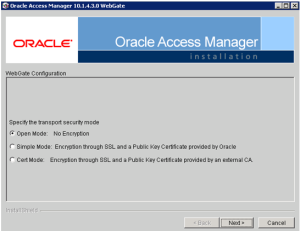
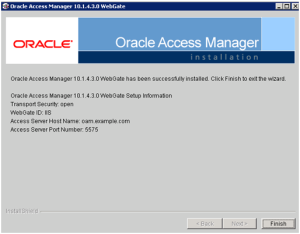
12. Select open mode
13. Fill it in with the information from oam admin console for configuration of Webgate.

14. Go to OAM Admin console.

NOTE- Before hitting next on the following screen we need to copy the ObAccessClient.xml file from the directory it shows And copy to <NetPoint webgate Install Home>\webgate\access\oblix\lib
15. Hit Next.


16. Now return to the installer and click Next

17. Click Next and Restart IIS


18. Open IIS Manager and select IIS domain and open ISAPI and CGI restrictions.

19. Verify that following dlls are added in this.

20. Open sharepoint site (e.g. OESDemo) and open ISAPI Filters.

21. Verify that following dll is added in this.

22. Open sharepoint site (e.g. OESDemo) and open Handler Mappings.

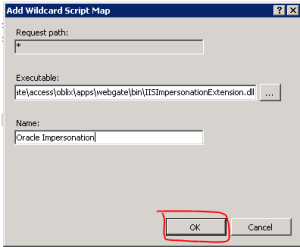
23. Right click and select Add Wildcard Script Map.
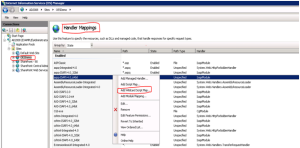
24. Add the following dll.
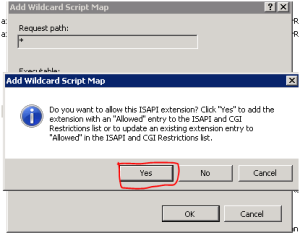
25. Popup will open. Click on Yes.
26. This will look like.

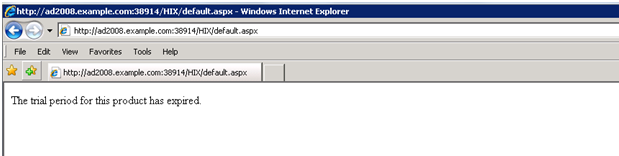
NOTE- If at the time of testing the integration some issue occurs stating “Trial Period Expired.” Then please delete this mapping, restart the IIS server and test it again.
27. Select Sharepoint Site and right click on it. Select Add Virtual Directory.

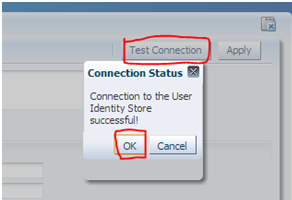
28. Add alias as ‘access’ and Physical path as (<Webgate installation HOME>/access). Click on Test Settings and if successful click OK.

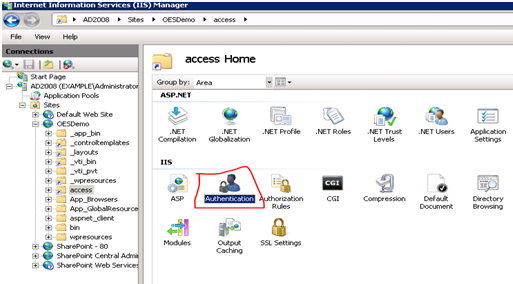
29. Open sharepoint site (e.g. OESDemo) and open Authentication.

30. Verify ASP.NET Impersonation and Windows Authentication enabled for Sharepoint site.

31. Make sure below users have “Modify” permission on “access” folder of SSO agent.
a. IUSR
b. IIS_IUSRS
c. NETWORK
d. NETWORK SERVICE
e. ADMINISTRATORS ( group)


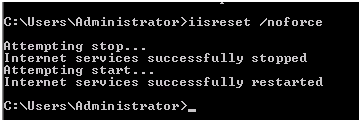
32. Restart the IIS server.

33. Add AD Adapter in OVD

34. Provide AD details and click next.

35. Verify that details are correct and click Next.

36. Provide the details and click Next.

37. Verify the details and Click Finish.

38. After the configuration it will look like-

39. Go back to the OAM console and Click System Configuration.
40. Then expand Data Sources, Highlight User Identity Stores and Click Create.
41. Create a New Identity store to use OVD and the AD root configured earlier.


42. Click on apply.

43. Go to Application Domain > IIS and click on Edit.

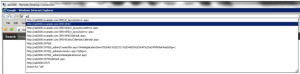
44. Go to Resource and New Resource.

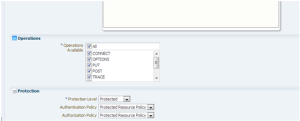
45. Go to Authorization Policies > Protected Resource Policy and click on Edit.

46. Go to Responses tab and Add following Responses.


47. Click on Apply.

48. Now Go to System Configuration > Access Manager > Authentication Module > LDAP and set User Identity Store as OVD-AD. Now click on Apply.

49. Now Go back to the IIS tab and Click Authentication Polices and Click Protected Resource Policy

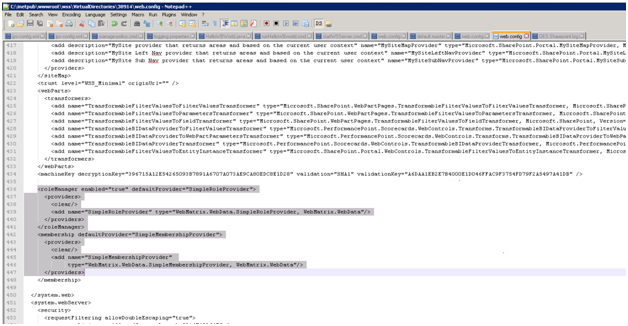
50. Now go to C:\inetpub\wwwroot\wss\VirtualDirectories\<YOUR_SITE_PORT>\web.config file and add the following lines between <system.web></system.web>
</system.web>
——————————————————————————————
——————————————————————————————-
<roleManager enabled=”true” defaultProvider=”SimpleRoleProvider”>
<providers>
<clear/>
<add name=”SimpleRoleProvider” type=”WebMatrix.WebData.SimpleRoleProvider, WebMatrix.WebData”/>
</providers>
</roleManager>
<membership defaultProvider=”SimpleMembershipProvider”>
<providers>
<clear/>
<add name=”SimpleMembershipProvider”
type=”WebMatrix.WebData.SimpleMembershipProvider, WebMatrix.WebData”/>
</providers>
</membership>
——————————————————————————————
——————————————————————————————-
</system.web>

51. Restart the IIS server, OES Server and OAM Admin/ OAM Server.
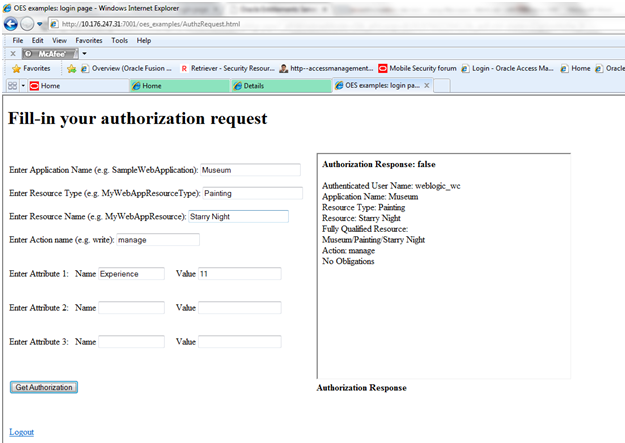
Testing
1. Start the Webservice SM.

2. Go to the and open site http://<host>:<port>/HIX
3. It will be redirected to Webgate.

- 4. Provide user credentials.

- 5. The Site Home page will be displayed.
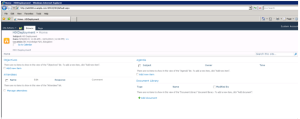
- 6. If the following error occurred at the time of authentication.

- 7. Then please remove the steps 23, 24, 25 from Set up OAM to protect SharePoint. Restart the IIS Server and test it again.
8. If the following error occurred at the time of authentication.

9. Then please remove the steps 50 from Set up OAM to protect SharePoint. Restart the IIS Server and test it again.